FreeBSD 12 enables VNET support by default, which gives each jail its own network stack and makes it easy to jail individual applications using iocage.
To get started, make sure FreeBSD 12.0-RELEASE is installed and that the system uses ZFS, which is required by iocage:
$ uname -a
FreeBSD freebsd 12.0-RELEASE-p7 FreeBSD 12.0-RELEASE-p7 GENERIC  amd64

$ zpool list
NAME    SIZE  ALLOC   FREE  CKPOINT  EXPANDSZ   FRAG    CAP  DEDUP  HEALTH  ALTROOT
zroot   928G  2.17G   926G        -         -     0%     0%  1.00x  ONLINE  -
My server gets its IP address from the router using DHCP, so the initial server settings look like this:
$ cat /etc/rc.conf
hostname="freebsd"
ifconfig_bge0="DHCP"
sshd_enable="YES"
# Set dumpdev to "AUTO" to enable crash dumps, "NO" to disable
dumpdev="AUTO"
zfs_enable="YES"

$ cat /etc/sysctl.conf
# $FreeBSD: releng/12.0/sbin/sysctl/sysctl.conf 337624 2018-08-11 13:28:03Z brd
$
#
#  This file is read when going to multi-user and its contents piped thru
#  ``sysctl'' to adjust kernel values.  ``man 5 sysctl.conf'' for details.
#

# Uncomment this to prevent users from seeing information about processes that
# are being run under another UID.
#security.bsd.see_other_uids=0

$ cat /etc/resolv.conf
# Generated by resolvconf
search hsd1.ca.comcast.net
nameserver 192.168.0.1
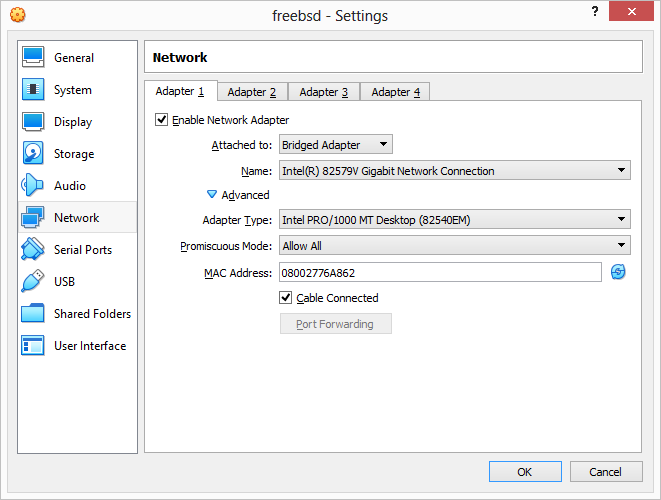
To try this in a VM rather than on real hardware, bridge the network adapter and enable promiscuous mode.
Examine rc.conf or run ifconfig to get the name of the network interface, which is bge0 in this case.
# cat /etc/rc.conf
hostname="freebsd"
ifconfig_bge0="DHCP"
sshd_enable="YES"
# Set dumpdev to "AUTO" to enable crash dumps, "NO" to disable
dumpdev="AUTO"
zfs_enable="YES"

# ifconfig
bge0: flags=8943<UP,BROADCAST,RUNNING,PROMISC,SIMPLEX,MULTICAST> metric 0 mtu 1500
        options=c0099<RXCSUM,VLAN_MTU,VLAN_HWTAGGING,VLAN_HWCSUM,VLAN_HWTSO,LINKSTATE>
        ether 2c:76:8a:ab:d9:32
        inet 192.168.0.107 netmask 0xffffff00 broadcast 192.168.0.255
        media: Ethernet autoselect (100baseTX <full-duplex>)
        status: active
        nd6 options=29<PERFORMNUD,IFDISABLED,AUTO_LINKLOCAL>
[...]
Edit rc.conf and add three lines to the bottom to enable iocage at startup, create a network bridge, and attach the bridge to the host’s network interface.
# cat /etc/rc.conf
hostname="freebsd"
ifconfig_bge0="DHCP"
sshd_enable="YES"
# Set dumpdev to "AUTO" to enable crash dumps, "NO" to disable
dumpdev="AUTO"
zfs_enable="YES"

iocage_enable="YES"
cloned_interfaces="bridge0"
ifconfig_bridge0="addm bge0 up"
Edit sysctl.conf and add four lines to the bottom to enable IP forwarding and disable packet filtering on the bridge.
# cat /etc/sysctl.conf
# $FreeBSD: releng/12.0/sbin/sysctl/sysctl.conf 337624 2018-08-11 13:28:03Z brd $
#
#  This file is read when going to multi-user and its contents piped thru
#  ``sysctl'' to adjust kernel values.  ``man 5 sysctl.conf'' for details.
#

# Uncomment this to prevent users from seeing information about processes that
# are being run under another UID.
#security.bsd.see_other_uids=0

net.inet.ip.forwarding=1       # Enable IP forwarding between interfaces
net.link.bridge.pfil_onlyip=0  # Only pass IP packets when pfil is enabled
net.link.bridge.pfil_bridge=0  # Packet filter on the bridge interface
net.link.bridge.pfil_member=0  # Packet filter on the member interface
Activate the appropriate zpool to tell iocage where to put files and fetch the lastest system release.
# zpool list
NAME    SIZE  ALLOC   FREE  CKPOINT  EXPANDSZ   FRAG    CAP  DEDUP  HEALTH  ALTROOT
zroot   928G  2.17G   926G        -         -     0%     0%  1.00x  ONLINE  -

# iocage activate zroot
ZFS pool 'zroot' successfully activated.

# iocage fetch -r latest
[...]
Fetching: 12.0-RELEASE
[...]
To create a jail that uses DHCP to request an IP address from the router, call iocage create and specify the bpf and dhcp parameters.
In this example, the router assigned IP address 192.168.0.116 to jail j0 on startup.
# iocage create -n "j0" -r latest --thickjail vnet="on" allow_raw_sockets="1" boot="on" bpf="yes" dhcp="on"
j0 successfully created!
* Starting j0
  + Started OK
  + Using devfs_ruleset: 5
  + Configuring VNET OK
  + Starting services OK
  + Executing poststart OK
  + DHCP Address: 192.168.0.116/24
Alternatively, to create a jail with a static IP address, call iocage create and specify the defaultrouter and ip4_addr parameters.
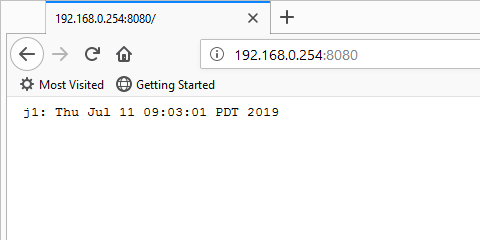
In this example, I have manually assigned IP address 192.168.0.254 to jail j1.
# iocage create -n "j1" -r latest --thickjail vnet="on" allow_raw_sockets="1" boot="on" defaultrouter="192.168.0.1" ip4_addr="192.168.0.254/24"
j1 successfully created!
* Starting j1
  + Started OK
  + Using devfs_ruleset: 6
  + Configuring VNET OK
  + Starting services OK
  + Executing poststart OK
Each time a jail starts, the system automatically copies /etc/resolv.conf from the host to the jail.
If the information in resolv.conf is not correct for some network setups, use the jail’s resolver property to override it.
# iocage set resolver="search hsd1.ca.comcast.net;nameserver 192.168.0.1" j0
On systems with more complicated network setups, use the jail’s interfaces property to assign the correct vnet and bridge to the jail.
# iocage set interfaces="vnet0:bridge0" j0
From another machine on the network, ping the jails to make sure they are working
C:\Windows\System32>ping 192.168.0.116

Pinging 192.168.0.116 with 32 bytes of data:
Reply from 192.168.0.116: bytes=32 time=1ms TTL=64
Reply from 192.168.0.116: bytes=32 time<1ms TTL=64
Reply from 192.168.0.116: bytes=32 time<1ms TTL=64
Reply from 192.168.0.116: bytes=32 time<1ms TTL=64

Ping statistics for 192.168.0.116:
    Packets: Sent = 4, Received = 4, Lost = 0 (0% loss),
Approximate round trip times in milli-seconds:
    Minimum = 0ms, Maximum = 1ms, Average = 0ms

C:\Windows\System32>ping 192.168.0.254

Pinging 192.168.0.254 with 32 bytes of data:
Reply from 192.168.0.254: bytes=32 time=1ms TTL=64
Reply from 192.168.0.254: bytes=32 time<1ms TTL=64
Reply from 192.168.0.254: bytes=32 time<1ms TTL=64
Reply from 192.168.0.254: bytes=32 time<1ms TTL=64

Ping statistics for 192.168.0.254:
    Packets: Sent = 4, Received = 4, Lost = 0 (0% loss),
Approximate round trip times in milli-seconds:
    Minimum = 0ms, Maximum = 1ms, Average = 0ms
Use iocage list to see the status of the jails.
# iocage list
+-----+------+-------+--------------+------------------+
| JID | NAME | STATE |   RELEASE    |       IP4        |
+=====+======+=======+==============+==================+
| 1   | j0   | up    | 12.0-RELEASE | DHCP             |
+-----+------+-------+--------------+------------------+
| 2   | j1   | up    | 12.0-RELEASE | 192.168.0.254/24 |
+-----+------+-------+--------------+------------------+
FreeBSD relies on rc scripts to start services as the system initializes.
Executable shell scripts placed inside the folder /usr/local/etc/rc.d will automatically run at system startup,
and this can also be used inside a jail to run programs when the jail starts.
The file system for each jail is stored under /zroot/iocage/jails/ on the host, making it possible for the host system to access the jailed file systems directly if needed.
To test the jail, make sure the rc.d folder exists inside the jail, then add an executable startup script to that folder and restart the jail.
The script in this example is a tiny web server that listens on port 8080 and reports the hostname and current date.