Install FreeBSD on a Headless Server Over SSH
It can be inconvenient to connect a keyboard and monitor to a headless server tucked away in a closet just to install an operating system. Instead, use VirtualBox to make a small number of changes to a FreeBSD installer image and use SSH to do the installation over the LAN.

Pacific Heights, San Francisco
To perform this trick using a Windows machine, you’ll need
-
a server with a wired LAN connection that has been set to automatically boot from a USB thumb drive in the BIOS
-
both the FreeBSD-11.1-RELEASE-amd64-bootonly.iso and FreeBSD-11.1-RELEASE-amd64-memstick.img files from the FreeBSD 11.1 Archive
-
a USB thumb drive at least 1GB in size to hold the memstick image
-
Win32 Disk Imager or Etcher to burn the memstick image to USB
-
VirtualBox installed on the Windows machine
-
a Windows SSH client such as OpenSSH under Cygwin, the Full version of Cmder (with Git for Windows), or PuTTY
Here are the steps to follow:
-
Find an unused IP address on the LAN that can be hard-coded into the FreeBSD installer. Check the settings page on the router to find one that’s not already reserved, or pick a random IP in the local address range and
pingit from the Windows console to make sure nothing answers. For many home networks,192.168.0.254is likely unused and might make a good candidate.λ ping 192.168.0.254 Pinging 192.168.0.254 with 32 bytes of data: Reply from 192.168.0.103: Destination host unreachable. Reply from 192.168.0.103: Destination host unreachable. Reply from 192.168.0.103: Destination host unreachable. Reply from 192.168.0.103: Destination host unreachable. Ping statistics for 192.168.0.254: Packets: Sent = 4, Received = 4, Lost = 0 (0% loss), -
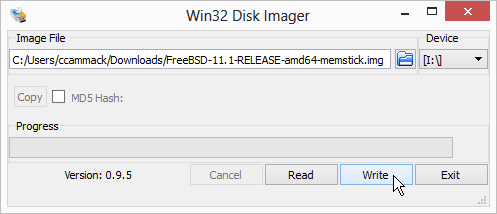
Use Win32 Disk Imager or Etcher to burn the memstick image to USB.
-
Use the command line version of VirtualBox to create a FreeBSD VM and mount the bootonly.iso file.
λ cd "C:\Program Files\Oracle\VirtualBox" λ VBoxManage createvm --name freebsd --register --ostype FreeBSD_64 Virtual machine 'freebsd' is created and registered. UUID: f5fbae41-7218-43d5-8a5b-8ce660351f05 Settings file: 'C:\Users\ccammack\VirtualBox VMs\freebsd\freebsd.vbox' λ VBoxManage modifyvm freebsd --usb on λ VBoxManage storagectl freebsd --name IDE --add IDE --controller PIIX4 --bootable on λ VBoxManage storageattach freebsd --storagectl IDE --port 0 --device 0 --type dvddrive --medium "C:\Users\ccammack\Downloads\FreeBSD-11.1-RELEASE-amd64-bootonly.iso" -
Start the FreeBSD VM, which will open a new console window, and let it Autoboot to the blue Welcome screen.
λ VBoxManage startvm freebsd

Waiting for VM "freebsd" to power on...
VM "freebsd" has been successfully started.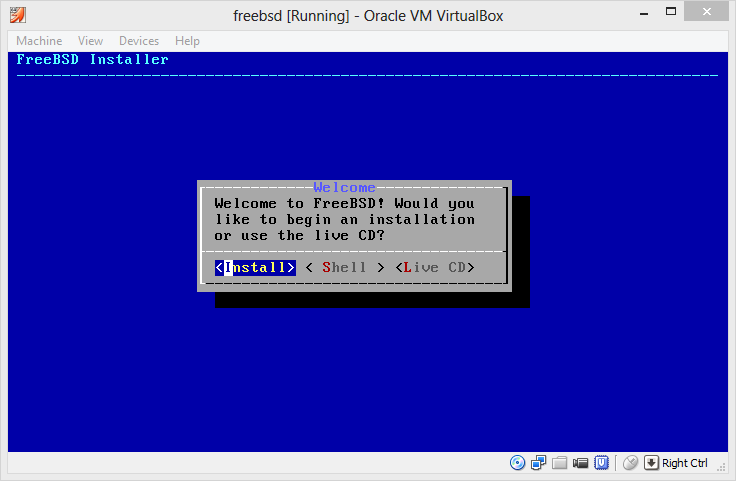
-
Press the
Esckey to exit the installer and login as root.![Press the [Esc] key and login as root](login-as-root.png)
-
Press the
Right Ctrlkey to get mouse control back, then open the VirtualBox menu for Devices>USB Devices and select the USB drive with the memstick image on it. If the USB drive does not appear in the menu, remove it and re-insert it.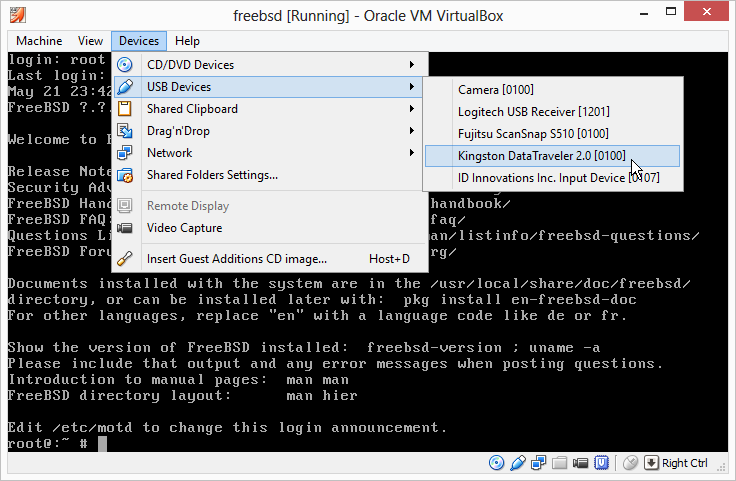
-
The USB drive will attach to the VM within in a few seconds and the device info will appear in the console in bold white text. In this example, the device name appears as da0. Press
Enterto get the command prompt back.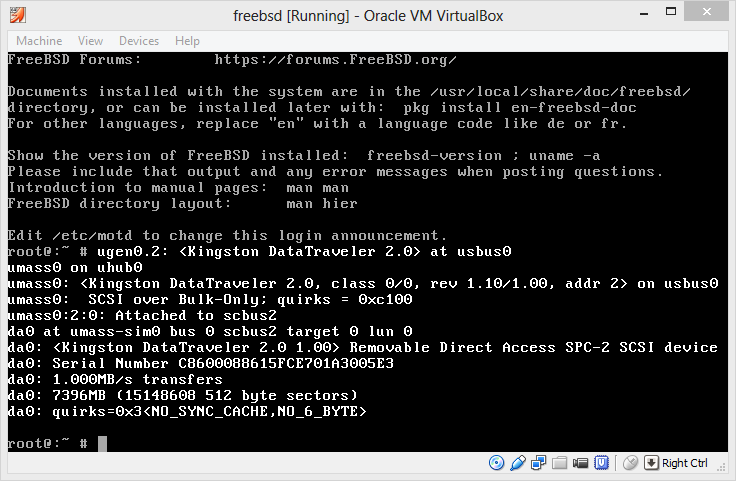
-
To list the partitions on the USB drive, enter
mount /dev/da0and press theTabkey to display them using shell completion.root@:~ # mount /dev/da0 da0% da0p1% da0p2% da0p3% da0p4% -
Try to mount each partition as /mnt in turn until the root file system successfully mounts (mine was on /dev/da0p3). The others will fail to mount with errors Invalid argument or Input/output error.
root@:~ # mount /dev/da0p1 /mnt mount: /dev/da0p1: Invalid argument root@:~ # mount /dev/da0p2 /mnt g_vfs_done():da0p2[READ(offset=65536, length=8192)]error = 5 mount: /dev/da0p2: Input/output error root@:~ # mount /dev/da0p3 /mnt -
Run
ls /mntto ensure that the root partition has mounted properly and contains the usual directories such as bin, boot, dev, tmp, usr and var.root@:~ # ls /mnt .cshrc HARDWARE.TXT boot media sbin .profile README.HTM dev mnt sys COPYRIGHT README.TXT docbook.css net tmp ERRATA.HTM RELNOTES.HTM etc proc usr ERRATA.TXT RELNOTES.TXT lib rescue var HARDWARE.HTM bin libexec root -
Modify the installer settings to hard-code the selected IP address and enable root logins over
ssh, then unmount the USB thumb drive and shutdown the VM.root@:~ # cd /mnt/etc root@:/mnt/etc # rm rc.local root@:/mnt/etc # sed -e 's/ro/rw/' -i "" fstab root@:/mnt/etc # echo ifconfig_DEFAULT=\"inet 192.168.0.254/24\" >> rc.conf root@:/mnt/etc # echo sshd_enable=\"YES\" >> rc.conf root@:/mnt/etc # cd ssh root@:/mnt/etc/ssh # echo "UseDNS no" >> sshd_config root@:/mnt/etc/ssh # echo "UsePAM no" >> sshd_config root@:/mnt/etc/ssh # echo "PasswordAuthentication yes" >> sshd_config root@:/mnt/etc/ssh # echo "PermitEmptyPasswords yes" >> sshd_config root@:/mnt/etc/ssh # echo "PermitRootLogin yes" >> sshd_config root@:/mnt/etc/ssh # cd root@:~ # umount /mnt root@:~ # shutdown -p now -
Eject the USB thumb drive from the Windows machine and insert it into the server. Boot the server, and within a couple of minutes, it should be possible to
sshas root from the Windows machine to the server using the192.168.0.254address selected earlier.λ ssh root@192.168.0.254 The authenticity of host '192.168.0.254 (192.168.0.254)' can't be established. ECDSA key fingerprint is SHA256:ImvbDP3bHFgCMi2HH8B+zzdho1vgkLEItB3Rx40QjDY. Are you sure you want to continue connecting (yes/no)? yes Warning: Permanently added '192.168.0.254' (ECDSA) to the list of known hosts. Last login: Wed May 21 01:15:16 2018 from 192.168.0.103 FreeBSD 11.1-RELEASE (GENERIC) #0 r321309: Fri Jul 21 02:08:28 UTC 2017 Welcome to FreeBSD! Release Notes, Errata: https://www.FreeBSD.org/releases/ Security Advisories: https://www.FreeBSD.org/security/ FreeBSD Handbook: https://www.FreeBSD.org/handbook/ FreeBSD FAQ: https://www.FreeBSD.org/faq/ Questions List: https://lists.FreeBSD.org/mailman/listinfo/freebsd-questions/ FreeBSD Forums: https://forums.FreeBSD.org/ Documents installed with the system are in the /usr/local/share/doc/freebsd/ directory, or can be installed later with: pkg install en-freebsd-doc For other languages, replace "en" with a language code like de or fr. Show the version of FreeBSD installed: freebsd-version ; uname -a Please include that output and any error messages when posting questions. Introduction to manual pages: man man FreeBSD directory layout: man hier Edit /etc/motd to change this login announcement. -
After logging in over SSH, run the
bsdinstallcommand and step through the wizard to install FreeBSD on the server. (During the installation, you must enable SSH and create at least one regular user account because FreeBSD disables password-based SSH access for the root user by default.)root@:~ # bsdinstallSome terminals might not have the proper settings to display the ACS line graphics characters correctly during the installation, but the installation process will still work even if the screen doesn’t look right. In my case, running SSH under CMD inside Cmder didn’t display properly, but running SSH under mintty inside Cmder displayed perfectly.
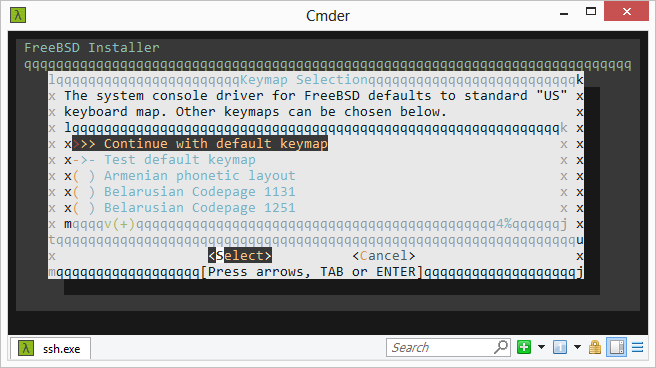
Running CMD inside Cmder fails to display ACS characters properly
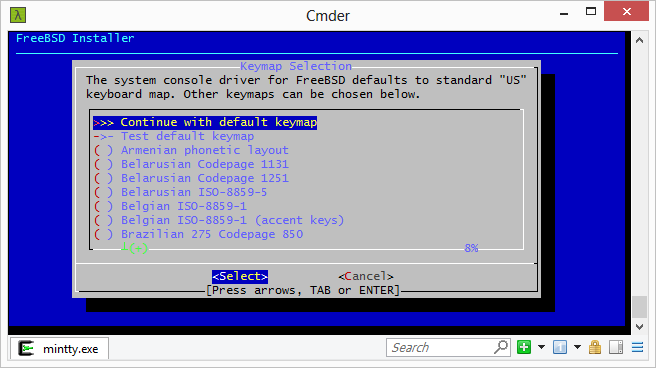
Running mintty inside Cmder displays ACS characters perfectly
-
After the installation finishes, shutdown the server, remove the USB thumb drive and reboot. If you elected to use DHCP or assigned a static IP address to the server during the installation, the system will have a new IP address after restarting. Check the router to get the new IP for the server and log in as a regular user.
λ ssh ccammack@192.168.0.111

Password for ccammack@server:
Last login: Wed May 21 03:30:41 2018 from 192.168.0.103
FreeBSD 11.1-RELEASE (GENERIC) #0 r321309: Fri Jul 21 02:08:28 UTC 2017

Welcome to FreeBSD!

Release Notes, Errata: https://www.FreeBSD.org/releases/
Security Advisories:   https://www.FreeBSD.org/security/
FreeBSD Handbook:      https://www.FreeBSD.org/handbook/
FreeBSD FAQ:           https://www.FreeBSD.org/faq/
Questions List: https://lists.FreeBSD.org/mailman/listinfo/freebsd-questions/
FreeBSD Forums:        https://forums.FreeBSD.org/

Documents installed with the system are in the /usr/local/share/doc/freebsd/
directory, or can be installed later with:  pkg install en-freebsd-doc
For other languages, replace "en" with a language code like de or fr.

Show the version of FreeBSD installed:  freebsd-version ; uname -a
Please include that output and any error messages when posting questions.
Introduction to manual pages:  man man
FreeBSD directory layout:      man hier

Edit /etc/motd to change this login announcement.
Need to see your routing table? Type "netstat -rn". The entry with the G
flag is your gateway.
                -- Dru <genesis@istar.ca>
$