To back up data inexpensively, using removable drives that you swap and carry off-site,
install a 5.25" to 3.5" hot swap bay in an old machine and centralize the backup process for all of your hosts onto a dedicated backup server running FreeBSD with ZFS.
Introduction
2022-07-16 Update: This approach also works in FreeBSD 13.1,
but requires a minor change to the zxfer script after installation to ignore some new ZFS properties.
I’ll eventually post an updated version of this backup system now that I have been using it several years
and have some revisions in mind.
This post explains how to set up a small FreeBSD backup server such that inserting a removable hard drive will automatically begin the daily backup process.
After the backup finishes early the next morning, the system will automatically dismount the removable drive so it can quickly be swapped for another one.
Nearly all client-side backup software supports backing up over Samba or SFTP, so this post covers how to configure both options.
It also explains how to back up the backup server itself and how to back up other FreeBSD hosts on the same network using ZFS replication.
Finally, it explains how to integrate a blink(1) status light to give visual feedback during the backup process.
The hardware I’m using for this is a Mini-ITX Intel J1900
inside an Inwin Development BM639 Mini ITX Slim Case,
which has internal bays for the OS and one external 5.25" DVD bay that can hold a hot swap drive tray.
This same approach should work just as well with a suitable single-board computer and an external USB drive dock.
The J1900 is a bit outdated and requires setting a couple of kernel options
to boot FreeBSD properly, but it’s perfectly capable of shuffling data from the network port to the backup drive.
In the motherboard settings, make sure AHCI is enabled for the SATA port attached to the removable drive to allow the hot swap feature to operate.
My own machine is a little quirky and will not enable the hot swap feature unless there is a drive present in the bay as the system boots.
Once booted, the feature operates properly and the drive can be hot swapped as many times as needed.
By default, the FreeBSD installer does not enable NTP, so the system clock may drift over time on some machines. Enable it if needed to keep the clock synchronized with the network time servers.
# tzsetup
[...]

# service ntpd stop
ntpd not running? (check /var/db/ntp/ntpd.pid).

# ntpd -gq
26 Jul 20:41:16 ntpd[26436]: ntpd 4.2.8p12-a (1): Starting
[...]
ntpd: time slew +0.000209s

# sysrc ntpd_enable="YES"
ntpd_enable: NO -> YES

# sysrc ntpd_sync_on_start="YES"
ntpd_sync_on_start: NO -> YES

# service ntpd start
Starting ntpd.
Prepare Each Removable Backup Drive
To prepare each removable drive, insert it into the hot swap bay and create the backup partition, geli container and backup zpool.
In this example, the system assigns device node ada1 to the drive.
Use the same password for all of the backup drives, which should be different than any password used for the system itself.
After preparing the drive, export the backup pool, detach the geli device and remove the drive from the system.
# zpool export backup

# zpool list
NAME    SIZE  ALLOC   FREE  CKPOINT  EXPANDSZ   FRAG    CAP  DEDUP  HEALTH  ALTROOT
zroot   117G  2.98G   114G        -         -     3%     2%  1.00x  ONLINE  -

# geli status
[...]
gpt/backup.eli  ACTIVE  gpt/backup

# geli detach gpt/backup.eli

# geli status
[...]
Repeat this process for the other removable drives in the backup set.
Create an Empty Backup Script
Create the backup script /usr/local/sbin/backup.sh, make it executable for root and add the hashbang line to the top.
To allow the script to automount the backup geli container when the drive is inserted, echo the backup drives’ geli password into /usr/local/etc/backup.passwd.
Spend a few moments in quiet reflection, considering the implications of that decision.
Double-check the permissions for both files.
# cd /usr/local/sbin
# ls backup.sh
ls: backup.sh: No such file or directory
# touch backup.sh
# chmod u+x backup.sh
# echo '#\!/bin/sh' > backup.sh
# cat backup.sh
#!/bin/sh
# ls -alg backup.sh
-rwxr--r--  1 root  wheel  0 Jun 16 22:30 backup.sh

# cd /usr/local/etc
# ls backup.passwd
ls: backup.passwd: No such file or directory
# touch backup.passwd
# chmod go= backup.passwd
# echo "1234" > backup.passwd
# cat backup.passwd
1234
# ls -alg backup.passwd
-rw-------  1 root  wheel  25 Jun 16 22:37 backup.passwd
Create a Dedicated User to Perform the Backups
Create a new user called backup whose only task will be to run the backup script.
# pw useradd -n backup -m -s /bin/sh

# passwd backup
Changing local password for backup
New Password:
Retype New Password:
Since the backup user will need to perform some actions that normally require root access, install doas and configure the backup user to run the script as root.
# pkg install -y doas
[..]

# echo 'permit nopass backup as root cmd /usr/local/sbin/backup.sh' >> /usr/local/etc/doas.conf

# cat /usr/local/etc/doas.conf
permit nopass backup as root cmd /usr/local/sbin/backup.sh
Switch to the backup user and make sure that the script refuses to run unless the full path of the script is specified with doas.
After testing, exit back to the root user.
# su backup
$ whoami
backup
$ cd /usr/local/sbin/
$ backup.sh
su: backup.sh: Permission denied
$ doas backup.sh
doas: Operation not permitted
$ /usr/local/sbin/backup.sh
su: /usr/local/sbin/backup.sh: Permission denied
$ doas /usr/local/sbin/backup.sh
$ exit
#
Detect Drive Insertion
FreeBSD uses the devd system to detect hardware changes such as inserting a drive into the hot swap bay.
Use nc to snoop the messages on devd.pipe and then insert the drive and wait for the GEOMCREATE messages to appear after a few seconds.
Remove the drive again and wait for the corresponding GEOMDESTROY messages, then press Ctrl-C to get the command prompt back.
The default configuration file for devd uses directory directives to indicate where the configuration files should be stored.
Use grep to see what the default configuration file expects and note that /etc/devd is the default location for config files created by the system.
User config files should be added to the secondary location, which is specified as /usr/local/etc/devd.
Consult the man pages for devd.conf for more information about detecting hardware events
and the configuration file format.
# grep directory /etc/devd.conf
        # Each "directory" directive adds a directory to the list of
        directory "/etc/devd";
        directory "/usr/local/etc/devd";
To configure devd to trigger specific actions when the drive is inserted and ejected, create a configuration file /usr/local/etc/devd/backup.conf
and add two notify statements, one each for drive insertion and ejection.
Inside each statement, add sub-statements to match the values given by the final GEOMCREATE and GEOMDESTROY events read from devd.pipe.
Finally, for each notify statement, create an action sub-statement that writes a message to the system log using logger.
# mkdir -p /usr/local/etc/devd

# ee /usr/local/etc/devd/backup.conf
[...]

# cat /usr/local/etc/devd/backup.conf
notify 100 {
    # insert backup drive
    match "system" "GEOM";
    match "subsystem" "DEV";
    match "type" "CREATE";
    match "cdev" "gpt/backup";
    action "logger Backup drive inserted";
};

notify 100 {
    # eject backup drive
    match "system" "GEOM";
    match "subsystem" "DEV";
    match "type" "DESTROY";
    match "cdev" "gpt/backup";
    action "logger Backup drive ejected";
};
To test the configuration, restart the devd service and run tail -f to watch the system log.
Next, insert the drive and wait a few seconds for the message Backup drive inserted to appear in the log.
Then, eject the drive and wait a few seconds for the message Backup drive ejected to appear in the log.
Finally, press Ctrl-C to get the command prompt back.
# service devd restart
Stopping devd.
Waiting for PIDS: 540.
Starting devd.

# tail -f /var/log/messages
[...]
May 30 01:01:30 server ccammack[53176]: Backup drive inserted
[...]
May 30 01:01:41 server ccammack[53177]: Backup drive ejected
^C
Once the basic devd functionality works, change the action sub-statements in the config file to call the backup script and restart the devd service.
The backup script relies on the blink(1) to give visual feedback during operation, so install it as explained here.
To control the blink(1), the first part of the script specifies some colors and functions to start and stop a repeating pattern of flashes using the --playpattern option.
My backup procedure calls for swapping the drives every morning. When a fresh drive is inserted, the system will automatically mount it and begin making backups.
Backups will repeat periodically until early the next morning and then the system will automatically unmount the drive so it can be swapped for the next one.
To do this, the script relies on three functions: the initialize and terminate functions mount and unmount the backup drive, preparing for backup and cleaning up afterwards;
the backup function performs the backup commands, sleeping for a while between each iteration.
If any command inside the initialize function fails, the backup function will be skipped, but the terminate function will still run for cleanup.
All three functions redirect their command outputs to the system logger and store their results in the corresponding result variable so the script can give visual feedback.
The LED flashes blue during the backup step and then a repeating sequence of three green or red lights at the end to
indicate the results of the initialize, backup and terminate functions, respectively.
The second half of the backup script implements these three functions plus some helper functions.
This section also includes result variables to hold the final output colors for each step of the backup, all of which default to $RED to indicate failure.
# ee /usr/local/sbin/backup.sh
[...]

# cat /usr/local/sbin/backup.sh
[...]

# blink(1) status results for each step
res_initialize="${RED}"
res_backup="${RED}"
res_terminate="${RED}"
res_status="\${res_initialize}\${res_backup}\${res_terminate}"

blink_play_status() {
  blink_play_pattern "$(eval echo "${res_status}")"
}

log() {
  logger "$(basename "$0"): ${1}" >/dev/null 2>&1
}

run() {
  # redirect stdout and stderr from command to log and return $?
  tempfile="$(mktemp /tmp/backup.XXXXXX)"
  exec 3> "$tempfile"
  exec 4< "$tempfile"
  rm "$tempfile"

  "$@" >&3 2>&1
  error=$?

  log "$* => $error"
  logger <&4 >/dev/null 2>&1

  exec 4<&-
  exec 3<&-
  return $error
}

initialize() {
  # abort if the backup drive is already mounted
  if run geli status gpt/backup.eli || \
     run zpool list backup
  then
    log "the backup drive is already mounted"; return 2
  fi

  # mount the backup drive
  if run geli attach -j /usr/local/etc/backup.passwd /dev/gpt/backup && \
     run zpool import backup
  then
    res_initialize="${GREEN}"; return 0
  fi

  return 1
}

backup() {
  # repeat until 3AM tomorrow
  end=$(date -v+1d +"%Y%m%d030000")
  until [ "$(date +"%Y%m%d%H%M%S")" -gt "$end" ]
  do
    # perform backup commands
    blink_play_pattern "${BLUE}"

    # sleep 15 minutes between backup cycles
    sleep 900
  done

  return 0
}

terminate() {
  log "dismounting backup drive"
  while zpool list backup; do
    zpool export backup && break
    sleep 1
  done
  while geli status gpt/backup.eli; do
    geli detach gpt/backup.eli && break
    sleep 1
  done

  res_terminate="${GREEN}"
}

if [ "$(pgrep -fl "$(basename "$0")" | wc -l)" -gt 0 ]; then
  # abort if the script is already running
  instances="$(pgrep -fl "$(basename "$0")")"
  log "already running ${instances}"
  echo "$(basename "$0"): already running ${instances}"
  exit 1
elif [ "$1" = "--on-insert" ]; then
  # process on-insert
  initialize; error=$?
  [ $error -eq 2 ] && { blink_play_status; exit; }
  [ $error -eq 0 ] && backup
  blink_play_status; terminate; blink_play_status
elif [ "$1" = "--on-eject" ]; then
  # process on-eject
  blink_clear_pattern
fi
First Drive Insertion Test
To run a basic functionality test on the script at this point, run tail -f to keep an eye on the logs and then insert the removable drive.
# tail -f /var/log/messages
[...]
Within a few seconds, the script should auto-mount the drive and the blink(1) should begin flashing blue.
If you were to leave it running like this until after 3AM tomorrow, the drive should automatically dismount and the blink(1) should begin flashing
green-red-green to indicate the results of the initialize, backup and terminate functions.
In general, any color other than green indicates an error in the corresponding function, which will also appear in the system log.
(In this case, the backup step flashes red at this point because the backup function is just a placeholder.)
If the blink(1) flashes red for the terminate step, do not physically eject the drive from the server until you have manually entered the proper commands
to cancel the backup script and dismount the drive.
For now, rather than waiting until tomorrow for the script to finish, cancel the backup script as described in the next section and eject the drive from the system.
You’ll eventually eject a drive by accident that hasn’t been properly dismounted, so here’s what I do when that happens.
There might be a more elegant way to solve this, but I just accept the loss of the data on the backup drive and use brute force to repartition it and bring it back as a blank disk.
(I have lots of backups.)
Put an exit at the top of the backup script to prevent it from running temporarily.
Reboot the server and use zpool destroy -f backup to destroy the orphaned backup pool by force, then repartition the drive as explained in the section called Prepare Each Removable Backup Drive.
After creating the partition, GELI container and zpool, create the datasets needed for each client as explained in the rest of this post.
The section below called Adding a New Backup Drive to the Rotation summarizes all of these steps for the example clients given here.
Cancel the Running Backup Script and Dismount Manually
Cancel the running backup script and the blink1-tool using pkill, then
use zpool export and geli detach to completely dismount the drive in FreeBSD before physically ejecting it from the case.
For convenience, implement a --cancel option by adding these commands as a new if block near the end of the script.
You can then cancel a running backup using the command backup.sh --cancel.
# ee /usr/local/sbin/backup.sh
[...]

# cat /usr/local/sbin/backup.sh
[...]

if [ "$1" = "--cancel" ]; then
  # cancel running script
  pkill -KILL -f backup.sh; pkill blink1-tool
  zpool export backup; geli detach gpt/backup.eli
elif [ "$(pgrep -fl "$(basename "$0")" | wc -l)" -gt 0 ]; then
  # abort if the script is already running
  instances="$(pgrep -fl "$(basename "$0")")"
[...]
Configure Samba Access
Samba network shares are widely supported by Windows, Mac and Unix-like systems and are a good destination for client-side backup software unless there is a reason to use something else.
In general, it’s safest to create a separate user account and destination dataset for each client that needs to back itself up.
Keeping the backup data for each client separate like this helps prevent them from accidentally overwriting each others’ backups.
Also, the destination dataset for each client must be created on each removable drive in the backup set, so you’ll have to rotate
through each of the drives during configuration to create them.
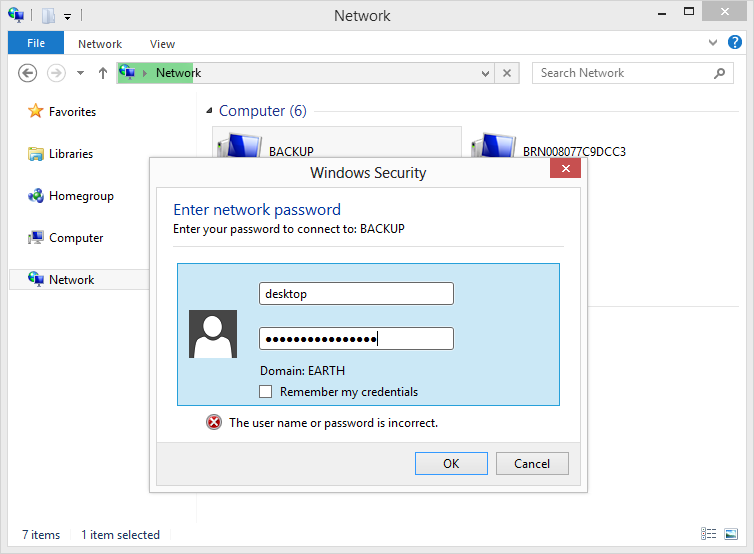
The rest of this example assumes that I am setting up Samba access for a desktop client named desktop which is running Windows 8.
First, create a new user account called desktop.
# pw useradd -n desktop -m -s /bin/sh

# passwd desktop
Changing local password for desktop
New Password:
Retype New Password:
Next, insert the first removable drive into the server, allow it to mount until the blink(1) begins flashing blue
and use zfs create to create a new dataset, named after the desktop client, where it can store its backup files.
After creating the dataset and setting its permissions, use backup.sh --cancel to cancel the script and dismount the drive before ejecting it from the backup server.
After the destination datasets have been created on the removable backup drives, find and install the latest version of Samba.
# pkg search samba
[...]
samba410-4.10.15               Free SMB/CIFS and AD/DC server and client for Unix

# pkg install -y samba410
[...]
Edit the Samba configuration file /usr/local/etc/smb4.conf to configure the global and per-client share settings.
# ee /usr/local/etc/smb4.conf
[...]

# cat /usr/local/etc/smb4.conf
[global]
workgroup = WORKGROUP
netbios name = BACKUP
security = user
passdb backend = tdbsam
encrypt passwords = yes
max log size = 512
hosts allow = 192.168.1.
bind interfaces only = yes
socket options = TCP_NODELAY
writable = no

[desktop]
path = /backup/desktop
force user = desktop
writable = yes
Use pdbedit to map the desktop user account to the Samba database.
Samba uses a separate password database from the system, so pdbedit will ask for a new Samba-specific password.
(I won’t tell anyone if you decide to use the same password for both Samba and the user account.)
# pdbedit --create --user=desktop
new password:
retype new password:
[...]
Use sysrc to add samba_server_enable=YES to the system’s rc.conf and then start the Samba server manually.
# sysrc samba_server_enable=YES
samba_server_enable:  -> YES

# service samba_server start
Performing sanity check on Samba configuration: OK
Starting nmbd.
Starting smbd.
Insert one of the backup drives, wait for the flashing blue LED and the \\BACKUP Samba share should appear on the local network.
Connect using the desktop user id and password and enable the checkbox that causes the system to remember them for future connections.
If the Samba share does not automatically appear on the network, it should still be accessible by entering the IP address of the server
in the file explorer as something like \\192.168.1.112 rather than \\BACKUP.
The network share will remain available until after 3AM the following day so the client can save files to it, or you can cancel and dismount manually if needed.
The drive will fail to dismount if a client is currently using the Samba share, so close all file explorer windows if you need to manually dismount the drive.
# backup.sh --cancel
Pull Mode vs. Push Mode Backups
Ideally, a backup scheme should operate in pull mode, where the backup server logs into each client and collects the data it needs,
rather than in push mode, where each client has independent access to the backup server and writes data to the server on its own schedule.
In my case, I’m using several different kinds of client-side software to back up each host, so pushing data to the backup server is my only option for those machines.
Because the system dismounts the backup drive around 3AM each morning, I schedule each client to stop performing backups at midnight to give them enough time to finish.
In theory it shouldn’t matter: the server will not take the backup drive offline if a client is currently writing to it
and the client backup software should be able to handle cases where the destination suddenly disappears.
Still, it’s something to consider.
Test a Windows Backup Over Samba Using restic
The example below shows what a test run would look like on Windows performing a client-side backup using restic:
Insert the backup drive into the server and wait for the LED to start flashing blue
Create a new temporary folder and file on the Windows machine
Create a new backup repository on the server using restic
Back up the temporary folder to the repository
Restore the temporary folder to a new location on the Windows machine
Generate file hashes for the original and restored files to make sure they match
Aside from Samba, another commonly supported way to send backups over the network is to use the SSH File Transfer Protocol.
Create a separate user account and dataset for each client to prevent rogue clients from deleting each other’s backups.
The following example sets up SFTP access on the backup server for a laptop client running Ubutntu 20.04.
To configure the server, first create a new user account called laptop and add it to the backup group.
# pw useradd -n laptop -m -s /bin/sh -G backup

# passwd laptop
Changing local password for laptop
New Password:
Retype New Password:
Next, create a new dataset, named after the laptop client, where it can store its backup files.
Repeat this for all removable drives in the backup set.
# zfs create backup/laptop

# zfs list
NAME                 USED  AVAIL  REFER  MOUNTPOINT
backup              2.02M  3.51T    88K  /backup
backup/desktop        88K  3.51T    88K  /backup/desktop
backup/laptop         88K  3.51T    88K  /backup/laptop
[...]

# chown -R laptop:backup /backup/laptop

# ls -alg /backup
[...]
drwxr-xr-x   2 desktop  backup    2 Jun  9 23:18 desktop
drwxr-xr-x   2 laptop   backup    2 Jun  9 23:18 laptop
To ensure that the client can log into the backup server initially with a user name and password, edit /etc/ssh/sshd_config to set PasswordAuthentication to yes and then restart sshd.
Some client backup software supports SFTP logins using user names and passwords.
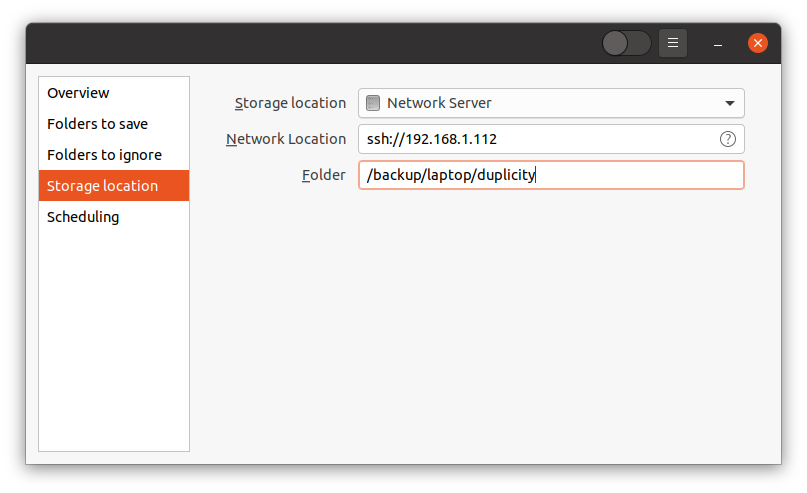
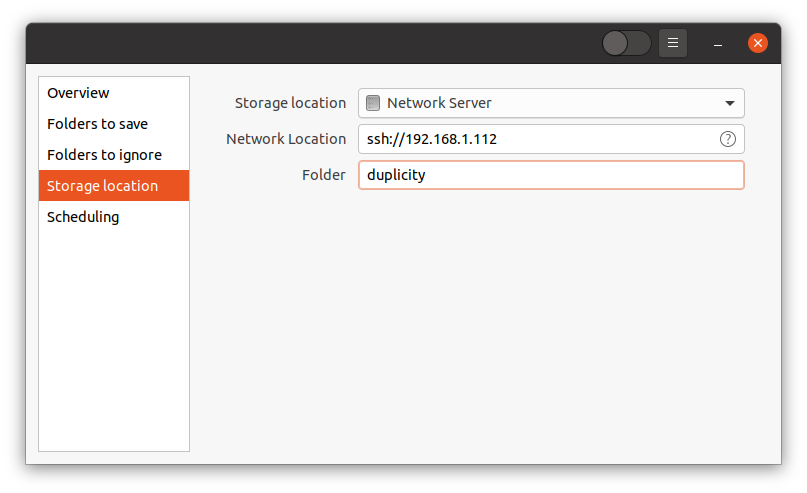
For example, to test the default backup program in Ubuntu 20.04, open the application called Backups (Déjà Dup),
then select Storage location to specify the server and destination folder for the backup files.
In this example, the Network Location of the backup server is ssh://192.168.1.112 and the destination Folder is the absolute path /backup/laptop/duplicity.
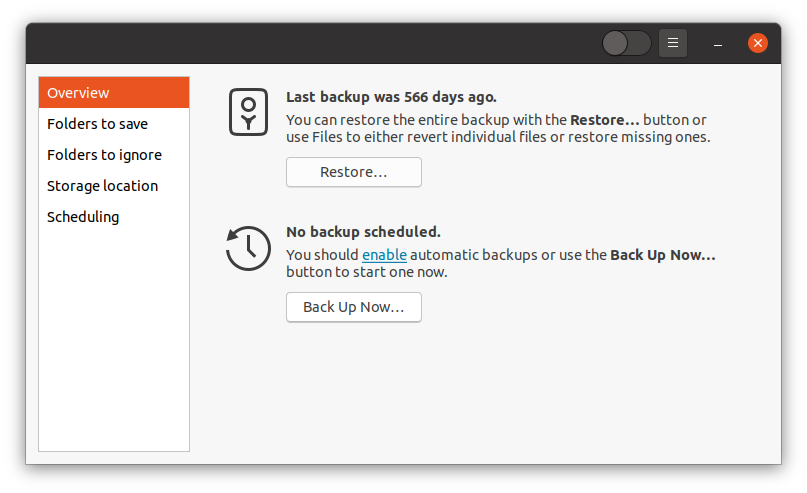
Next, select Overview > Back Up Now… to open the Back Up dialog.
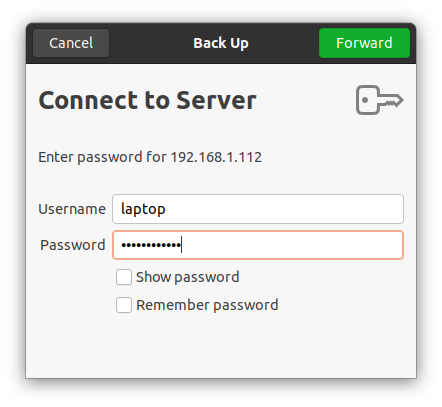
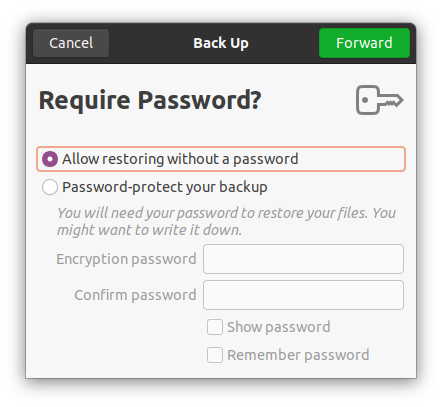
On the Back Up dialog, enter the Username and Password and press the Forward button.
Select the option to encrypt the backup files with a password if desired and then press the Forward button again to start the backup.
Prefer SSH Keys Over Passwords
Some backup software might require the use of SSH keys rather than passwords, and it’s generally better to use them rather than passwords if possible.
There are many options for SSH key management, but they all follow the same basic procedure:
Generate SSH keys on the client machine. This can be done in the terminal using ssh-keygen or in a GUI keyring manager like the Passwords and Keys (Seahorse) application in Ubuntu 20.04.
Copy the public SSH key from the client machine to the server using any method you like and append it to the end of the user’s authorized_keys file,
located under the user’s home directory at ~/.ssh/authorized_keys.
On the client machine, before connecting to the server, decrypt the private SSH key into RAM by running ssh-agent and ssh-add in the terminal
or by relying on a keyring manager (console or GUI) to handle the whole procedure automatically.
The client can now securely connect to the backup server as needed without manually entering a user name and password each time.
After the clients have been configured to log into the SFTP server to save their backups, it’s good to restrict each
client to its own directory on the server to prevent rogue clients from accidentally overwriting each other’s backup files.
To do this, add a new Match block to the bottom of the sshd configuration that matches all members of the backup group
and uses ChrootDirectory and ForceCommand to restrict each of them to its own backup directory.
Restart the sshd service to put the new configuration into effect.
# ee /etc/ssh/sshd_config
[...]

# tail /etc/ssh/sshd_config
[...]
# restrict each <user> in the backup group to directory /backup/<user>
Match Group backup
        ChrootDirectory /backup/
        ForceCommand internal-sftp -d %u

# service sshd restart
Performing sanity check on sshd configuration.
Stopping sshd.
Waiting for PIDS: 846.
Performing sanity check on sshd configuration.
Starting sshd.
After making this change, also change the destination Folder in the backup software to be relative (duplicity) rather than absolute (/backup/laptop/duplicity) .
Configure the Backup Server to Back Itself Up
Since the backup server is running FreeBSD with ZFS, use zfs-auto-snapshot and
zxfer to back up the backup server to itself.
First, set up zfs-auto-snapshot and then use zfs list -t to make sure snapshots are being generated.
# zfs list -t snapshot
NAME                                                         USED  AVAIL  REFER  MOUNTPOINT
zroot@zfs-auto-snap_monthly-2020-06-01-00h28                    0      -    88K  -
zroot@zfs-auto-snap_weekly-2020-06-07-00h14                     0      -    88K  -
zroot@zfs-auto-snap_daily-2020-06-11-00h07                      0      -    88K  -
[...]
Next, install zxfer and create a new dataset for the host’s backup files on each removable drive.
Finally, call zxfer from inside the script’s backup function.
The script will count the number of attempts that complete without error using the self_ variables and
will flash green to report that the overall process succeeded if at least one attempt worked during the daily cycle.
backup() {
  # track backup attempts and successes
  self_tries=0; self_successes=0

  # repeat until 3AM tomorrow
  end=$(date -v+1d +"%Y%m%d030000")
  until [ "$(date +"%Y%m%d%H%M%S")" -gt "$end" ]
  do
    # perform backup commands
    blink_play_pattern "${BLUE}"

	# back up self
    self_tries=$((self_tries+1))
    if run /usr/local/sbin/zxfer -dFkPv \
      -I com.sun:auto-snapshot \
	  -R zroot backup/"$(hostname -s)"
	then
      self_successes=$((self_successes+1))
	fi

    # sleep 15 minutes between backup cycles
    sleep 900
  done

  # report backup results
  log "$(hostname -s) backed up ${self_successes}/${self_tries} attempts"
  if [ $self_successes -gt 0 ]; then
    res_backup="${GREEN}"
  fi

  return 0
}
Back Up FreeBSD Clients to the Backup Sever
If the network contains any other machines running FreeBSD, they can also be backed up in pull mode over ssh using zfs-auto-snapshot and zxfer.
In this example, the FreeBSD client to be backed up is named bsdclient.
ZFS replication depends on snapshots, so log into the bsdclient machine
and set up zfs-auto-snapshot.
Run zfs list -t snapshot after a while to make sure the snapshots begin to appear on the system.
# zfs list -t snapshot
NAME                                                         USED  AVAIL  REFER  MOUNTPOINT
zroot@zfs-auto-snap_monthly-2020-06-01-00h28                    0      -    88K  -
zroot@zfs-auto-snap_weekly-2020-06-07-00h14                     0      -    88K  -
zroot@zfs-auto-snap_daily-2020-06-11-00h07                      0      -    88K  -
[...]
Create a new backup user on the bsdclient machine that will be used for ssh logins.
Use zfs allow to grant the backup user the ability to send zfs data to the backup server.
# pw useradd -n backup -m -s /bin/sh

# passwd backup
Changing local password for backup
New Password:
Retype New Password:

# zfs allow -u backup send zroot

# zfs allow zroot
---- Permissions on zroot --------------------------------------------
Local+Descendent permissions:
        user backup send
Set PasswordAuthentication yes inside /etc/ssh/sshd_config and restart sshd to allow the backup server to log into bsdclient using a password.
Over on the backup server, create a new dataset named after the client machine and transfer its ownership to the backup user.
# zfs create backup/bsdclient

# zfs list
NAME                 USED  AVAIL  REFER  MOUNTPOINT
backup              2.02M  3.51T    88K  /backup
backup/bsdclient      88K  3.51T    88K  /backup/bsdclient
backup/desktop        88K  3.51T    88K  /backup/desktop
backup/laptop         88K  3.51T    88K  /backup/laptop
[...]

# chown -R backup:backup /backup/bsdclient

# ls -alg /backup
[...]
drwxr-xr-x   2 backup   backup    2 Jun  9 23:51 bsdclient
drwxr-xr-x   2 desktop  backup    2 Jun  9 23:18 desktop
drwxr-xr-x   2 laptop   backup    2 Jun  9 23:18 laptop
Log into the bsdclient machine once from the root account of the backup server to make sure it gets added to the root’s known_hosts file.
# ssh backup@192.168.1.108
The authenticity of host '192.168.1.108 (192.168.1.108)' can't be established.
ECDSA key fingerprint is SHA256:8zMgBz/uX1pu5Dmf5nmtKLtNB9f6JF5uuJPKXpU8aGw.
No matching host key fingerprint found in DNS.
Are you sure you want to continue connecting (yes/no)? yes
Warning: Permanently added '192.168.1.108' (ECDSA) to the list of known hosts.
Password for backup@bsdclient:
FreeBSD 12.1-RELEASE r354233 GENERIC

Welcome to FreeBSD!
[...]

$ exit
Connection to 192.168.1.108 closed.
Switch to the backup user and generate ssh keys using ssh-keygen.
Accept the default options and leave the passphrase empty so that the backup script will be able to decrypt the private key without a password.
Finally, copy the public ssh key to the client using ssh-copy-id.
After this, it should be possible to ssh from the backup server to the bsdclient machine as the backup user without entering a password.
# su backup

$ ssh-keygen
Generating public/private rsa key pair.
Enter file in which to save the key (/home/backup/.ssh/id_rsa):
Created directory '/home/backup/.ssh'.
Enter passphrase (empty for no passphrase):
Enter same passphrase again:
Your identification has been saved in /home/backup/.ssh/id_rsa.
Your public key has been saved in /home/backup/.ssh/id_rsa.pub.
[...]

$ ssh-copy-id -i ~/.ssh/id_rsa.pub backup@192.168.1.108
The authenticity of host '192.168.1.108 (192.168.1.108)' can't be established.
ECDSA key fingerprint is SHA256:8zMgBz/uX1pu5Dmf5nmtKLtNB9f6JF5uuJPKXpU8aGw.
No matching host key fingerprint found in DNS.
Are you sure you want to continue connecting (yes/no)? yes
Warning: Permanently added '192.168.1.108' (ECDSA) to the list of known hosts.
Password for backup@bsdclient:

$ ssh backup@192.168.1.108
Last login: Tue Jun 23 21:59:38 2020 from backup.ccammack.com
FreeBSD 12.1-RELEASE r354233 GENERIC

Welcome to FreeBSD!
[...]

$ exit
Connection to 192.168.1.108 closed.
Finally, add code the to script’s backup function to call zxfer again, this time in pull mode, to back up the bsdclient machine.
Add new bsdclient_ variables to keep track of attempts and successes and report those results in the log.
Display a green flash to indicate success if each client is backed up successfully at least once during the daily cycle.
backup() {
  # track backup attempts and successes
  self_tries=0; self_successes=0
  bsdclient_tries=0; bsdclient_successes=0

  [...]

	# back up bsdclient
    bsdclient_tries=$((bsdclient_tries+1))
    if run /usr/local/sbin/zxfer -dFkPv \
      -I com.sun:auto-snapshot \
	  -O 'backup@192.168.1.108 -i /usr/home/backup/.ssh/id_rsa' \
	  -R zroot backup/bsdclient
	then
      bsdclient_successes=$((bsdclient_successes+1))
	fi

    # sleep 15 minutes between backup cycles
    sleep 900
  done

  # report backup results
  log "$(hostname -s) backed up ${self_successes}/${self_tries} attempts"
  log "bsdclient backed up ${bsdclient_successes}/${bsdclient_tries} attempts"
  if [ $self_successes -gt 0 ] && [ $bsdclient_successes -gt 0 ]; then
    res_backup="${GREEN}"
  fi

  return 0
}
Cancel Backup If the Drive Is Too Full
Use zpool list to check the used space on the drive and cancel the backup immediately if it’s over 80% full.
If the drive runs low on space, the blink(1) will flash magenta for the backup step in the final results.
backup() {
  # abort if the backup drive is over 80% full
  if [ "$(zpool list -H -o capacity backup | sed -r 's/%//g')" -gt 80 ]; then
    log "backup disk is low on space"
    res_backup="${MAGENTA}"
	return 1
  fi

  # track backup attempts and successes
  self_tries=0; self_successes=0
  bsdclient_tries=0; bsdclient_successes=0

  [...]
Scrub for ZFS Errors
To add a new step to scrub the backup drives for ZFS errors, add two new helpers, call them from the backup function
and add a new res_scrub variable to display the results on the blink(1).
As written, the drive inserted on Saturday will be scrubbed, so cycling through a small number of drives will cause each one to scrub once every few weeks.
Because this adds a new step, the final output from the blink(1) will consist of four flashes rather than three.
The scrub process will flash white on the blink(1) while waiting to finish and either green for success or magenta for failure as the third flash in the final results.
On most days, when the scrub step does not run at all, the blink(1) will flash green-green-off-green.
On days when the scrub runs, the blink(1) will flash green-green-green-green.
[...]

# blink(1) status results for each step
res_initialize="${RED}"
res_backup="${RED}"
res_scrub="${OFF}"
res_terminate="${RED}"
res_status="\${res_initialize}\${res_backup}\${res_scrub}\${res_terminate}"

[...]

scrub_start() {
  # run zpool scrub on Saturdays
  if [ "$(date +"%u")" -eq 6 ]; then
    log "starting zpool scrub backup"
	run zpool scrub backup
    return 0
  fi
  return 1
}

scrub_wait() {
  blink_play_pattern "${WHITE}"
  while zpool status backup | \
      grep -E " scan: +scrub in progress since " >/dev/null 2>&1
  do
    log "waiting for zpool scrub backup"
    sleep 60
  done
  log "finished zpool scrub backup"
  blink_clear_pattern
  results=$(zpool status backup | \
            sed -n 's/^.*scan: scrub repaired *//p' | \
            sed -n 's/ *in .*with */;/p' | \
            sed -n 's/ *errors on .*$//p' | \
            tr -d 'A-Z')
  repaired=$(echo "$results" | cut -d ';' -f1)
  errors=$(echo "$results" | cut -d ';' -f2)
  if [ "$repaired" -eq 0 ] && [ "$errors" -eq 0 ]; then
    res_scrub="${GREEN}"
	return 0
  fi

  log "zfs scrub repaired: ${repaired} with errors: ${errors}"
  res_scrub="${MAGENTA}"
  return 1
}

backup() {
  # abort if the backup drive is over 80% full
  [...]

  # start zpool scrub
  scrub_start; scrub=$?

  # track backup attempts and successes
  [...]

  [...]

  # wait for zfs scrub to finish
  [ "$scrub" -eq 0 ] && scrub_wait

  return 0
}

[...]
blink(1) Output Summary
During the run, the blink(1) will flash blue while backing up and white while scrubbing.
The final results will display up to four flashes, one each for initialize, backup, scrub and terminate,
where green indicates success and red indicates failure.
The scrub status flash will only appear on days after the scrub step runs, so it will appear on Sundays in the current script.
Magenta flashes indicate a disk-related failure:
low disk space will abort the backup step and flash magenta in its place;
a failed scrub will flash magenta for the scrub step and green otherwise.
On most days, when the process finishes without error and scrub does not run, the blink(1) will flash green-green-off-green.
When this sequence appears, remove the old drive and insert the next one to restart the backup process for the next day.
Adding a New Backup Drive to the Rotation
To add a new removable drive to the backup rotation, temporarily disable the backup script by adding an exit at the top.
# head /usr/local/sbin/backup.sh
#!/bin/sh
exit
[...]
Then, insert the new drive and create the partition, GELI container and zpool.
For convenience, implement an --init option by adding these commands as a new elif block at the bottom of the script.
You can then initialize a brand new drive using the command backup.sh --init and entering the encryption password.